
Home » Security in microservices with Spring Boot and Kafka
Security in microservices with Spring Boot and Kafka
Introduction
In this article, we will explore how we can achieve security in distributed microservices using Spring Boot and Kafka.
Imagine you are building a big e-commerce platform where multiple microservices handle different aspects of order processing. The system includes services for user authentication, order placement, inventory management, and payment processing. These microservices need to communicate securely with each other, ensuring that only authenticated and authorized requests are processed.
Table of Contents
Business case
This simple business case aims to demonstrate how security can be implemented in distributed systems. Our goal is to set up both the ordering and payment systems for our e-commerce website. Orders are placed by users into the ordering microservice, which then asynchronously connects with the payment microservice to process payments. These two microservices need to be safe. How are we going to do that?
Setting up Kafka broker
Apache Kafka is an open-source, distributed event streaming platform designed to handle high-throughput, real-time data feeds. Initially developed by LinkedIn and later open-sourced under the Apache Software Foundation, Kafka is used to build real-time data pipelines and streaming applications. It is optimized for high speed and low latency, making it an excellent choice for asynchronous communication in distributed systems.
As our broker, I’ve chosen Kafka to provide asynchronous communication. Kafka uses a publish-subscribe messaging pattern where producers publish messages to topics, and consumers subscribe to those topics to receive messages. Furthermore, it enables loose coupling between microservices by acting as an intermediary for asynchronous communication. This increases scalability and flexibility of the system, which is important for an e-commerce platform that will handle a large number of transactions.
To run Kafka in Docker, we need to setup also Zookeeper and the best way to do it is by creating a docker-compose file.
					version: '3.8'
services:
  zookeeper:
    image: confluentinc/cp-zookeeper:7.4.0
    environment:
      ZOOKEEPER_CLIENT_PORT: 2181
      ZOOKEEPER_TICK_TIME: 2000
    ports:
      - "2181:2181"

  kafka:
    image: confluentinc/cp-kafka:7.4.0
    depends_on:
      - zookeeper
    ports:
      - "9092:9092"
    environment:
      KAFKA_BROKER_ID: 1
      KAFKA_ZOOKEEPER_CONNECT: zookeeper:2181
      KAFKA_LISTENER_SECURITY_PROTOCOL_MAP: PLAINTEXT:PLAINTEXT
      KAFKA_ADVERTISED_LISTENERS: PLAINTEXT://localhost:9092
      KAFKA_OFFSETS_TOPIC_REPLICATION_FACTOR: 1
Setting up Keycloak
In addition to Kafka, we must also set up Keycloak, an open-source identity and access management solution. Keycloak provides features such as single sign-on (SSO), user federation, identity brokering, and social login. It will handle authentication and authorization for our system, ensuring that only authenticated users can produce and consume messages. Integrating Keycloak with Kafka will enhance the security of our messaging system by managing user identities and access permissions effectively.
Let’s complete the docker-compose file by adding Keyclaok.
A database is typically included with Keycloak in order to store the data. However, to keep things simple, we shall use Keycloak without the database in this demonstration.
After running the 3 components we just added, create a realm in Keycloak UI named ecommerce and a client named backend. The configuration of the client can be retrieved from this article titled “Secure your application with Spring Security and Keycloak”. It is important to also create a user into the realm ecommerce with a username and password that you prefer. We will need it to login later on into the order-service.
I would suggest you to go through the article for learning in more details how to create a Spring Boot application secured with Keycloak. Nonetheless, don’t worry! I will go through the most important aspects about securing the microservice with Keycloak.
					version: '3.8'
services:

  // zookeper and kafka

  keycloak:
    image: quay.io/keycloak/keycloak:24.0.2
    environment:
      KEYCLOAK_ADMIN: admin
      KEYCLOAK_ADMIN_PASSWORD: admin
    ports:
      - "8080:8080"
    command: ["start-dev"]
Architecture design of our microservices
Before starting to implement our solution, we need to design it first. Design first!
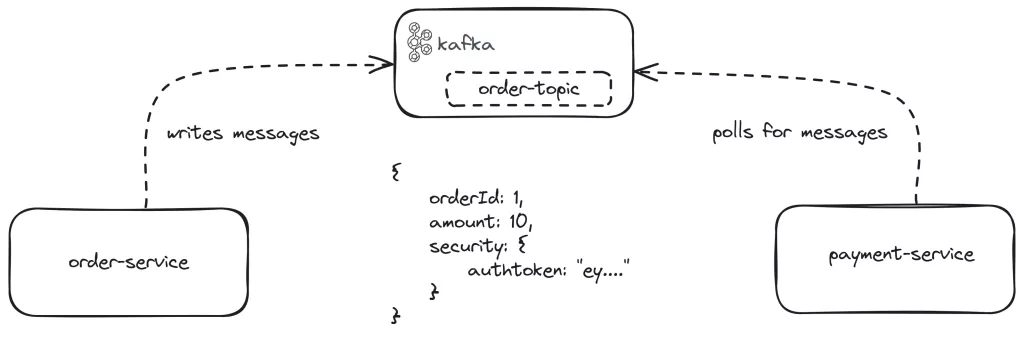
Our order-service is a Spring Boot application that writes messages about orders to the Kafka topic named order-topic. The message written for demonstration purposes includes the order id, the amount of money and most importantly, the authorization token.
On that topic, our other microservice named payment-service is listening for messaging in a poll fashion. In the background, Spring Kafka does a while loop polling continouiosly for messages in the topic.
Setting up order service
In this section, we will setup the order service. The main job of this service will be to expose an endpoint, which we will call to send the “order” into the Kafka topic. We will use Swagger (also known as OpenAPI) to easily test our microservices.
The dependencies that we will use for this application are written below.
					<dependencies>
		<dependency>
			<groupId>org.springframework.boot</groupId>
			<artifactId>spring-boot-starter-web</artifactId>
		</dependency>
		<dependency>
			<groupId>org.springframework.kafka</groupId>
			<artifactId>spring-kafka</artifactId>
		</dependency>
		<dependency>
			<groupId>org.springframework.boot</groupId>
			<artifactId>spring-boot-starter-oauth2-resource-server</artifactId>
		</dependency>
		<dependency>
			<groupId>org.springframework.boot</groupId>
			<artifactId>spring-boot-starter-security</artifactId>
		</dependency>
		<dependency>
			<groupId>org.springdoc</groupId>
			<artifactId>springdoc-openapi-starter-webmvc-ui</artifactId>
			<version>2.5.0</version>
		</dependency>
		<dependency>
			<groupId>org.projectlombok</groupId>
			<artifactId>lombok</artifactId>
			<optional>true</optional>
		</dependency>
		<dependency>
			<groupId>org.springframework.boot</groupId>
			<artifactId>spring-boot-starter-test</artifactId>
			<scope>test</scope>
		</dependency>
		<dependency>
			<groupId>org.springframework.kafka</groupId>
			<artifactId>spring-kafka-test</artifactId>
			<scope>test</scope>
		</dependency>
	</dependencies>
Setting up security with Keycloak
Both of our services will use the same security implementation. If we take care of one of them, we can take care of the other with ease. In situations like these, when various microservices exchange code, a library would be quite helpful. Code duplication would be prevented, and maintenance would be simpler.
First of all, we need to add the security configuration class SecurityConfig where we configure the application to use OAuth 2.0 resource server with JWT tokens.
The annotation @EnableMethodSecurity(prePostEnabled = true) is used in Spring Security to enable method-level security in a Spring Boot application
					@Configuration
@EnableWebSecurity
@EnableMethodSecurity(prePostEnabled = true)
public class SecurityConfig {

	@Autowired
	private KeycloakClientRoleConverter keycloakClientRoleConverter;

	@Bean
	public SecurityFilterChain configurePaths(HttpSecurity http,
			@Value("${security.authentication.unsecure.paths}") List<String> springSecurityAllowedPaths)
			throws Exception {
		AntPathRequestMatcher[] allowedPaths = springSecurityAllowedPaths.stream().map(AntPathRequestMatcher::new)
				.toArray(AntPathRequestMatcher[]::new);

		http.sessionManagement(
				sessionManagement -> sessionManagement.sessionCreationPolicy(SessionCreationPolicy.STATELESS));
		http.authorizeHttpRequests(authorizeHttpRequests -> authorizeHttpRequests.requestMatchers(allowedPaths)
				.permitAll().anyRequest().authenticated());
		http.oauth2ResourceServer(
				oauth2 -> oauth2.jwt(jwt -> jwt.jwtAuthenticationConverter(jwtAuthenticationConverter())));

		return http.build();
	}

	private Converter<Jwt, ? extends AbstractAuthenticationToken> jwtAuthenticationConverter() {
		JwtAuthenticationConverter jwtConverter = new JwtAuthenticationConverter();
		jwtConverter.setJwtGrantedAuthoritiesConverter(keycloakClientRoleConverter);
		return jwtConverter;
	}

}
Next, we will create the KeycloakClientRoleConverter class that uses the convert method to simply extract the roles from the jwt object and convert them into a list of SimpleGrantedAuthority objects. These roles are then automatically set into the SecurityContext of Spring Security.
					@Component
public class KeycloakClientRoleConverter implements Converter<Jwt, Collection<GrantedAuthority>> {

	private static final String ROLES = "roles";
	private static final String REALM_ACCESS = "realm_access";

	@Override
	public Collection<GrantedAuthority> convert(Jwt jwt) {
		Map<String, Object> realmAccess = Optional.ofNullable(jwt.getClaimAsMap(REALM_ACCESS))
				.orElseGet(() -> Collections.emptyMap());
		return Optional.ofNullable((List<?>) realmAccess.get(ROLES)).orElseGet(() -> Collections.emptyList()).stream()
				.map(Object::toString).map(SimpleGrantedAuthority::new).collect(Collectors.toList());
	}

}
Moreover, we need to integrate Swagger to use the Keycloak implicit flow. The way to achieve this is by creating the SwaggerConfig class.
					@Configuration
@OpenAPIDefinition(security = { @SecurityRequirement(name = "bearer") })
@SecuritySchemes(value = {
@SecurityScheme(name = "bearer", type = SecuritySchemeType.OAUTH2,
    flows = @OAuthFlows(implicit = @OAuthFlow(authorizationUrl = "${security.authorization.url}"))) })
public class SwaggerConfig {

}
Finally, all we need to do is to add the properties we have used until now and more into the application.properties file.
					spring.application.name=orderservice
server.port=9000

# openapi
springdoc.api-docs.enabled=true
springdoc.api-docs.path=/api/json
springdoc.swagger-ui.enabled=true
springdoc.swagger-ui.path=/api/ui
springdoc.cache.disabled=true

# security
security.authentication.unsecure.paths=/api/**
keycloak.realm=ecommerce
keycloak.base.url=http://localhost:8080
security.authorization.url=${keycloak.base.url}/realms/${keycloak.realm}/protocol/openid-connect/auth
spring.security.oauth2.resourceserver.jwt.issuer-uri=${keycloak.base.url}/realms/${keycloak.realm}
Configuring Kafka producer in order service
To configure Kafka, we must create the KafkaConfig class, which is a Spring configuration class that sets up the necessary Kafka components for producing and consuming messages in a Spring Boot application. There is a key difference between the order service and the payment service. In this simplified scenario, the order service is only a producer, while the payment service will be only a consumer. As you can see in the code snippet below, the order service includes only the necessary Kafka configurations for sending messages.
In a larger distributed system with Spring Boot and Kafka, services can be producers and consumers at the same time. They send and listen to messages into topics populated by other services.
					@Configuration
public class KafkaConfig {

	@Value("${kafka.bootstrap.server.url:localhost:9092}")
	private String bootstrapServerUrl;

	@Bean
	public KafkaAdmin kafkaAdmin() {
		Map<String, Object> configs = new HashMap<>();
		configs.put(AdminClientConfig.BOOTSTRAP_SERVERS_CONFIG, bootstrapServerUrl);
		return new KafkaAdmin(configs);
	}

	@Bean
	public ProducerFactory<String, OrderMessage> producerFactory() {
		Map<String, Object> configs = new HashMap<>();
		configs.put(ProducerConfig.BOOTSTRAP_SERVERS_CONFIG, bootstrapServerUrl);
		configs.put(ProducerConfig.KEY_SERIALIZER_CLASS_CONFIG, StringSerializer.class);
		configs.put(ProducerConfig.VALUE_SERIALIZER_CLASS_CONFIG, JsonSerializer.class);
		return new DefaultKafkaProducerFactory<String, OrderMessage>(configs);
	}

	@Bean
	public KafkaTemplate<String, OrderMessage> kafkaTemplate(ProducerFactory<String, OrderMessage> producerFactory) {
		return new KafkaTemplate<String, OrderMessage>(producerFactory);
	}

}
KafkaAdmin Configuration
The KafkaAdmin bean manages Kafka topics and other administrative tasks. To configure this bean, we have created a map to hold the Kafka configuration settings. The key AdminClientConfig.BOOTSTRAP_SERVERS_CONFIG is used to set the Kafka bootstrap server URL, which is the address of the Kafka cluster. This URL is injected into the class using the @Value annotation, referencing a property defined in the application properties file. Don’t forget to add it! Once the configuration map is populated, it is passed to the KafkaAdmin constructor, creating a KafkaAdmin bean that can handle administrative operations for Kafka.
ProducerFactory Configuration
The ProducerFactory bean is responsible for creating Kafka producer instances, which are used to send messages to Kafka topics. In the producerFactory method, we have prepared a map on which we must set several important properties. The ProducerConfig.BOOTSTRAP_SERVERS_CONFIG key sets the Kafka bootstrap server URL, enabling the producer to connect to the Kafka cluster. The ProducerConfig.KEY_SERIALIZER_CLASS_CONFIG specifies the serializer for the message key, which in this case is StringSerializer. The ProducerConfig.VALUE_SERIALIZER_CLASS_CONFIG sets the serializer for the message value, using JsonSerializer to handle OrderMessage objects. This configuration map is then used to create a DefaultKafkaProducerFactory bean, which can produce Kafka producers configured with these settings.
KafkaTemplate Configuration
The KafkaTemplate bean simplifies sending messages to Kafka. It wraps the low-level producer functionality into a higher-level abstraction, making it easier to produce messages. The kafkaTemplate method creates a KafkaTemplate bean using the previously defined producerFactory bean. By passing the producerFactory to the KafkaTemplate constructor, we ensure that the template uses the same configurations defined for the producer factory, such as the bootstrap server URL and serializers for keys and values. This setup allows for easy and efficient message production to Kafka topics.
Configuring Kafka consumer in payment service
Since the payment service is a Kafka consumer, as was mentioned in the previous section, we must modify the KafkaConfig class to suit that purpose.
					public class KafkaConfig {

	private static final String ORDER_SERVICE_GROUP_ID = "payment-service";

	@Value("${kafka.bootstrap.server.url:localhost:9092}")
	private String bootstrapServerUrl;

	@Bean
	public ConsumerFactory<String, OrderMessage> consumerFactory() {
		Map<String, Object> configs = new HashMap<>();
		configs.put(ConsumerConfig.BOOTSTRAP_SERVERS_CONFIG, bootstrapServerUrl);
		configs.put(ConsumerConfig.GROUP_ID_CONFIG, ORDER_SERVICE_GROUP_ID);
		configs.put(ConsumerConfig.ALLOW_AUTO_CREATE_TOPICS_CONFIG, true);
		return new DefaultKafkaConsumerFactory<String, OrderMessage>(configs, new StringDeserializer(),
				new JsonDeserializer<OrderMessage>(OrderMessage.class, false));
	}

	@Bean
	public ConcurrentKafkaListenerContainerFactory<String, OrderMessage> kafkaListenerContainerFactory(
			ConsumerFactory<String, OrderMessage> consumerFactory) {
		ConcurrentKafkaListenerContainerFactory<String, OrderMessage> kafkaListenerContainerFactory = new ConcurrentKafkaListenerContainerFactory<String, OrderMessage>();
		kafkaListenerContainerFactory.setConsumerFactory(consumerFactory);
		return kafkaListenerContainerFactory;
	}
}
ConsumerFactory Configuration
The ConsumerFactory bean creates Kafka consumer instances, which are used to receive messages from Kafka topics. In the consumerFactory method, a configuration map is prepared, setting several properties necessary for consumer operation. The ConsumerConfig.BOOTSTRAP_SERVERS_CONFIG key sets the Kafka bootstrap server URL, enabling the consumer to connect to the Kafka cluster. The ConsumerConfig.GROUP_ID_CONFIG specifies the consumer group ID, which is used to manage the offset of messages consumed by different consumers in the same group. The ConsumerConfig.ALLOW_AUTO_CREATE_TOPICS_CONFIG allows the consumer to create topics automatically if they do not exist. Additionally, the key and value deserializers are set using StringDeserializer and JsonDeserializer, respectively, to handle OrderMessage objects. This configuration map is then used to create a DefaultKafkaConsumerFactory bean.
ConcurrentKafkaListenerContainerFactory Configuration
The ConcurrentKafkaListenerContainerFactory bean facilitates the creation of Kafka listener containers, which manage the execution of Kafka message listeners. The kafkaListenerContainerFactory method creates this bean using the previously defined consumerFactory bean. By passing the consumerFactory to the ConcurrentKafkaListenerContainerFactory constructor, we ensure that the container factory uses the same configurations defined for the consumer factory, such as the bootstrap server URL, consumer group ID, and deserializers. This setup allows for easy and efficient management of Kafka message listeners, enabling the application to consume messages from Kafka topics and process them accordingly.
Configuring Kafka listener in payment service
After setting up all required configurations, we need to create a component called a KafkaListener.
					@Slf4j
@Service
@RequiredArgsConstructor
public class OrderListener {

	private static final String ORDER_TOPIC = "order_topic";
	private static final String KAFKA_LISTENER_CONTAINER_FACTORY = "kafkaListenerContainerFactory";

	private final PaymentService paymentService;
	private final JwtDecoder jwtDecoder;
	private final KeycloakClientRoleConverter keycloakClientRoleConverter;

	@KafkaListener(topics = ORDER_TOPIC, containerFactory = KAFKA_LISTENER_CONTAINER_FACTORY)
	public void listen(OrderMessage message) throws Exception {
		log.info("order message arrived {}", message);
		Security security = message.getSecurity();
		if (security == null) {
			throw new Exception("unauthorized");
		}
		Jwt jwt = jwtDecoder.decode(security.getAuthToken());
		JwtAuthenticationToken token = new JwtAuthenticationToken(jwt, keycloakClientRoleConverter.convert(jwt));
		SecurityContextHolder.getContext().setAuthentication(token);

		// Process the received OrderMessage
		log.info("processing the received order message");
		String result = paymentService.executePayment(message.getOrderId(), message.getAmount());
		log.info("result of payment process: {}", result);
	}
}
Kafka Listener Method
We have annotated the listen method in the OrderListener class with @KafkaListener, making it a Kafka message listener. The @KafkaListener annotation has attributes topics and containerFactory, which are set to ORDER_TOPIC and KAFKA_LISTENER_CONTAINER_FACTORY, respectively. These attributes specify the Kafka topic to listen to and the Kafka listener container factory to use. When a message arrives on the specified topic, it triggers the listen method. The method takes an OrderMessage as its parameter, which represents the received Kafka message.
Security Context Setup
This is the most important part for achieving security in our distributed microservices. Inside the listen method, first we retrieve the Security object from the received OrderMessage. If the Security object is null, we throw an exception to indicate unauthorized access. This implementation is solely for demonstration purposes.
This verification ensures that each message contains essential security credentials. Subsequently, we utilize jwtDecoder, initialized automatically by spring-boot-starter-security, to decode the JWT token from the Security object. Additionally, leveraging KeycloakClientRoleConverter, we convert the JWT token’s roles into a collection of GrantedAuthority. Finally, we place this token into SecurityContextHolder to establish the security context for the current thread. This step ensures that subsequent operations have the proper security credentials, allowing us to securely process the message.
Processing the OrderMessage
After setting up the security context, we can process the OrderMessage by calling the executePayment method on the paymentService. We pass the order ID and amount from the OrderMessage to the executePayment method, which is solely a dummy method.
This setup ensures that our application listens to the specified Kafka topic, verifies the security credentials of incoming messages, and processes the messages using the appropriate business logic. By following this approach, we can securely and efficiently handle Kafka messages in our Spring Boot applications.
Furthermore, the PaymentService interface defines a contract for executing the payment operations. It declares a single method executePayment with the @PreAuthorize annotation, which ensures that only authenticated users can invoke this method. This annotation dynamically checks if the current user is authenticated before allowing the method to proceed. When called, executePayment accepts parameters orderId of type Long and amount of type Double, representing the details necessary to process a payment.
					public interface PaymentService {

	@PreAuthorize("isAuthenticated()")
	String executePayment(Long orderId, Double amount);
}
Sending message from order service
It’s time to test our architecture. Firstly, we need to create the service OrderService that contains a simple dummy method for “adding” orders.
					@Service
@RequiredArgsConstructor
public class OrderServiceImpl implements OrderService {

	private static final String ORDER_TOPIC = "order_topic";

	private final KafkaTemplate<String, OrderMessage> kafkaTemplate;

	@Override
	public String addOrder() {
		var auth = (JwtAuthenticationToken) SecurityContextHolder.getContext().getAuthentication();
		String authToken = auth.getToken().getTokenValue();
		Security security = new Security();
		security.setAuthToken(authToken);
		OrderMessage message = new OrderMessage();
		message.setOrderId(1L);
		message.setAmount(Double.valueOf(20));
		message.setSecurity(security);
		kafkaTemplate.send(ORDER_TOPIC, message);

		return "OK";
	}

}
The addOrder method, implemented from the OrderService interface, orchestrates the process of adding an order. Inside this method, the authentication token (JwtAuthenticationToken) is retrieved from the current security context (SecurityContextHolder). The token’s value is extracted and assigned to authToken. A new Security object is instantiated and initialized with authToken, encapsulating security information for the order message. Additionally, an OrderMessage object is created and populated with an order ID (1L), amount (20.0), and the previously constructed security object. The kafkaTemplate.send method is then invoked to send the OrderMessage to the ORDER_TOPIC Kafka topic.
If you’re curious about the controller implementation, here it is. It’s straightforward!
					@RestController
@RequestMapping("/order")
@RequiredArgsConstructor
public class OrderController {

	private final OrderService orderService;

	@PostMapping("/new")
	public ResponseEntity<String> makeAnOrder() {
		return new ResponseEntity<String>(orderService.addOrder(), HttpStatus.CREATED);
	}
}
We may view the payment service logs after calling the endpoint via our application interface’s Swagger UI.
					[paymentservice] [ntainer#0-0-C-1] c.l.p.services.impl.OrderListener        : order message arrived OrderMessage(orderId=1, amount=20.0, security=Security(authToken=eyJhbGciOiJSUzI1NiIsInR5cCIgOiAiSldUIiwia2lkIiA6ICJGY3M1alo5ejZaR0ZRVWJmaE4tUjg3bGd0NEs0QnBIcjcwRVJocng2YWFRIn0.eyJleHAiOjE3MjA4OTExNTQsImlhdCI6MTcyMDg5MDI1NCwiYXV0aF90aW1lIjoxNzIwODkwMjU0LCJqdGkiOiI5NDE2NGFjMi0yYTY2LTQwMWItYjdhOS01Y2JlOWRmZDMzOTQiLCJpc3MiOiJodHRwOi8vbG9jYWxob3N0OjgwODAvcmVhbG1zL2Vjb21tZXJjZSIsImF1ZCI6ImFjY291bnQiLCJzdWIiOiI4NDFlMjI1Yy0yNGZlLTQ1ZTMtOTBhNC1jM2ZkMDlmYzRkNGQiLCJ0eXAiOiJCZWFyZXIiLCJhenAiOiJiYWNrZW5kIiwic2Vzc2lvbl9zdGF0ZSI6IjVmYjcyNTI0LTUwZTgtNDhiOC1iYmMzLWE0ODMwNGIzMDhhZSIsImFjciI6IjEiLCJhbGxvd2VkLW9yaWdpbnMiOlsiaHR0cDovLyoiXSwicmVhbG1fYWNjZXNzIjp7InJvbGVzIjpbImRlZmF1bHQtcm9sZXMtZWNvbW1lcmNlIiwib2ZmbGluZV9hY2Nlc3MiLCJ1bWFfYXV0aG9yaXphdGlvbiJdfSwicmVzb3VyY2VfYWNjZXNzIjp7ImFjY291bnQiOnsicm9sZXMiOlsibWFuYWdlLWFjY291bnQiLCJtYW5hZ2UtYWNjb3VudC1saW5rcyIsInZpZXctcHJvZmlsZSJdfX0sInNjb3BlIjoiZW1haWwgcHJvZmlsZSIsInNpZCI6IjVmYjcyNTI0LTUwZTgtNDhiOC1iYmMzLWE0ODMwNGIzMDhhZSIsImVtYWlsX3ZlcmlmaWVkIjp0cnVlLCJuYW1lIjoiTGVqZGkgUHJpZnRpIiwicHJlZmVycmVkX3VzZXJuYW1lIjoicHJpZnRpbCIsImdpdmVuX25hbWUiOiJMZWpkaSIsImZhbWlseV9uYW1lIjoiUHJpZnRpIiwiZW1haWwiOiJsZWpkaS5wcmlmdGlAbGlua3NtdC5pdCJ9.alVrnLWvn9PaGtp9ek5btChB4BY4HwOhVbypGjMEx5rRQ5E9nL9_KuJJMhBk-2JZJTReocz2DvrnaKRLtnblbFHnN2b48yD2mTjj4JDRW_vNPcXpbsRrabB8bdvxJT0nnwttX4yNXHl0qzjWDICCt6HYSjCpVWrfcwDnJr2Rl_9-QpSbMzhLZlkv1njLXyrGHObLn6uAv-d7K2T9NeNgt4S8OJJ-NiajBGerXmoc6VIxmW5aHCqa6HfZ5nJEn8DMcmRdekFgDZWU046exd8yHAzqawZ9pk-ZjgjFn-0tu0p_XrOkB6ZPM06O7iUy_2ycWR2bX8EkQQl9EA3b51r_ww))
[paymentservice] [ntainer#0-0-C-1] c.l.p.services.impl.OrderListener        : processing the received order message
[paymentservice] [ntainer#0-0-C-1] c.l.p.services.impl.PaymentServiceImpl   : payment successful for order with id 1, total amount paid: 20.0
[paymentservice] [ntainer#0-0-C-1] c.l.p.services.impl.OrderListener        : result of payment process: OK
And that’s how you implement security in distributed microservices using Spring Boot and Kafka.
If you want to learn more about Spring Boot, checkout the blog.
Happy coding!