
Home » Configuring WebSocket in Spring-Boot and React
Configuring WebSocket in Spring-Boot and React
Introduction
In this article, I’ll guide you through configuring WebSocket in Spring-Boot using it with React and SockJS. Additionally, we’ll explore various methods to implement WebSocket and WebSocket handlers in Spring Boot.
Table of Contents
Support
I invite you to support my work by following me on Twitter and sharing my content. Your engagement helps spread valuable information and keeps the community informed and connected. By sharing, you not only support my efforts but also help others discover useful insights and resources. Thank you for being a part of this journey!
Required dependencies
We only need two dependencies because I’m aiming to keep the number of required dependencies to a minimum.
The spring-boot-starter-websocket dependency includes all the necessary components to set up and use WebSockets in a Spring Boot application. WebSockets provide a way to open a two-way interactive communication session between the user’s browser and a server. This is particularly useful for applications that require real-time updates, such as chat applications, live notifications, gaming, etc.
Furthemore, we will also use lombok, which is a Java library that helps to reduce boilerplate code in Java applications by using annotations to generate common methods and constructors at compile-time. This leads to cleaner and more readable code.
Let’s jump into code now!
					<dependencies>
    <dependency>
        <groupId>org.springframework.boot</groupId>
        <artifactId>spring-boot-starter-websocket</artifactId>
    </dependency>
    <dependency>
        <groupId>org.projectlombok</groupId>
        <artifactId>lombok</artifactId>
        <scope>provided</scope>
    </dependency>
</dependencies>
WebSocket with SockJS configuration
There are two kinds of WebSocket settings you may create: plain and using SockJS, as I already said in the introduction.
Implementing WebSockets with SockJS provides broader browser compatibility and automatic fallback mechanisms, making it ideal for applications that need to support older browsers or handle restrictive network conditions. SockJS simplifies development by abstracting transport complexities and ensuring reliable real-time communication through a consistent API, albeit with some performance overhead and an additional dependency.
In contrast, using plain WebSockets offers more direct control over the implementation, lower latency, and no extra dependencies. This approach suits environments where WebSocket support is assured and performance is a priority, although it requires manual handling of connection failures and lacks built-in fallbacks for unsupported browsers or network issues.
So, which one should you pick? Well, you should choose plain WebSockets for controlled environments needing maximum performance, and opt for SockJS when supporting a wide range of browsers and ensuring resilience in various network conditions.
First of all, we will go and create the WebSocketConfig configuration class. It implements the WebSocketMessageBrokerConfigurer and is annotated with Configuration and EnableWebSocketMessageBroker .
@EnableWebSocketMessageBroker enables WebSocket-based messaging within the application and configures it as a message broker.
					@Configuration
@EnableWebSocketMessageBroker
public class WebSocketConfig implements WebSocketMessageBrokerConfigurer {

@Override
public void configureMessageBroker(MessageBrokerRegistry config) {
    config.enableSimpleBroker("/topic");
    config.setApplicationDestinationPrefixes("/app");
    }

@Override
public void registerStompEndpoints(StompEndpointRegistry registry) {
    registry.addEndpoint("/")
    .setAllowedOrigins("http://localhost:3000")
    .withSockJS();
    }
}
Now, let’s look at the methods within the WebSocketConfig class:
The configureMessageBroker(MessageBrokerRegistry config) method is used to configure the message broker for the WebSocket.
config.enableSimpleBroker("/topic") enables a simple message broker that allows clients to subscribe to and receive messages from the specified destination prefix, which is /topic. Messages sent by the server to topics starting with /topic will be broadcasted to connected clients.
config.setApplicationDestinationPrefixes("/app") sets the application destination prefix. Clients can send messages to destinations that start with this prefix. For example, a client can send a message to /app/destination.
To summarize, you send messages to prefix /app and you subscribe/listen for messages to prefix /topic.
Stomp endpoint registration
registerStompEndpoints(StompEndpointRegistry registry) registers a Stomp (Simple Text Oriented Messaging Protocol) endpoint that clients can connect to.
registry.addEndpoint("/") registers the root endpoint (i.e., “/”) as the WebSocket endpoint. Clients can connect to this endpoint to establish WebSocket connections and we will see how in the React app.
withSockJS() enables SockJS support, which is a JavaScript library that provides a WebSocket-like interface for browsers that don’t support WebSocket directly. This allows broader client compatibility.
Spring Message Endpoint
Let’s create a simple controller. @Controller indicates that this class is a Spring MVC controller. It handles WebSocket requests.
@MessageMapping("/chat/{chatId}") indicates that it handles messages sent to the specified WebSocket destination. The @SendTo("/topic/chat/{chatId}") annotation specifies the destination to which the method will send the response. This is where the client on React will be listening to. However, pay attention. This broadcasts the message to all the clients that are connected to that endpoint and not only to one session. If you want to send the message specifically to the session connected, you will need to use @SendToUser(value="/topic/chat/{chatId}", broadcast=false).
@DestinationVariable String chatId extracts the chatId from the destination path.
@Payload Message<UserText> message extracts the message payload from the incoming message.
					@Slf4j
@Controller
public class WebSocketController {

 private final Map<String, List<UserText>> chats = new HashMap<>();

 @MessageMapping("/chat/{chatId}")
 @SendTo("/topic/chat/{chatId}")
 public List<UserText> sendMessageWithWebsocket(@DestinationVariable String chatId,
   @Payload Message<UserText> message) {
  log.info("new message arrived in chat with id {}", chatId);
  List<UserText> messages = this.chats.getOrDefault(chatId, new ArrayList<UserText>());
  messages.add(message.getPayload());
  chats.put(chatId, messages);
  return messages;
 }
}
Here, we store the messages in an array called messages and then store that array in a map with the chat ID as its identifier. Using the annotation @DestinationVariable, we can obtain the chat ID. Every user will subscribe to a different conversation and only view the messages in that chat.
Start your application and run the following command in terminal to check if you can connect successfully to the WebSocket endpoint.
wscat -c ws://localhost:8080/websocket
React with SockJS implementation
To connect to React, we will need the following dependency:
npm install --save @stomp/stompjs
Let’s edit the App.tsx to suit our needs. What we do here, is that we define the WebSocket broker url which connects to our server. Afterwards, we configure the client on line 20 and specify what it must execute when it connects for the first time in line 25. In line 37, we activate the client. All this is done inside the useEffect whenever the chatId changes.
Finally, in line 56, whenever the button is clicked, we send the message in the topic we configured before. In this case, the message is hard coded but it can be easily retried from an input element.
					import { Client } from '@stomp/stompjs';
import { useEffect, useState } from 'react';
import './App.css';
import logo from './logo.svg';

function App() {
  let client: Client | null = null;

  const [chatId, setChatId] = useState("")

  useEffect(() => {
    // Create a WebSocket connection

    client = new Client();

    // Configure the WebSocket endpoint URL
    const websocketUrl = 'ws://localhost:8080/websocket'; // Replace with your WebSocket endpoint URL

    // Connect to the WebSocket server
    client.configure({
      brokerURL: websocketUrl,
      debug: function (str) {
        console.log(str);
      },
      onConnect: () => {
        // Perform actions after successful connection
        const destination = `/topic/chat/${chatId}`; // Specify the destination for the server-side message handler
        client && client.subscribe(destination, (message) => {
          console.log('Received message:', JSON.parse(message.body));
          // Process the received message as needed
        });
      },
      // You can add more event handlers and configuration options as needed
    });

    // Connect to the WebSocket server
    client.activate();


    // Clean up the connection on component unmount
    return () => {
      client && client.deactivate();
    };
  }, [chatId]);


  return (
    <div className="App">
      <header className="App-header">
        <img src={logo} className="App-logo" alt="logo" />
        <p>
          <input type='text' aria-label='ChatId' onChange={(event) => {
            console.log(event)
            setChatId(event.target.value)
          }}></input>
          <button onClick={() => {
            const destination = `/app/chat/${chatId}`; // Specify the destination for the server-side message handler
            const message = 'Hello, server!'; // Specify the message to send
            if (client != null) {
              client.publish({
                destination,
                body: JSON.stringify({
                  data: message,
                  userId: 1 // Specify a user ID
                }),
              });
            }
          }}>Send</button>
        </p>
      </header>
    </div>
  );
}

export default App;
Plain WebSocket configuration
Now, let’s look at how we can implement the plain WebSocket communication between Spring-Boot and React.
In the PlainWebSocketConfig class, we configure a WebSocket server in our Spring Boot application using the @Configuration and @EnableWebSocket annotations to enable WebSocket support. It implements the WebSocketConfigurer interface, which allows customization of WebSocket handler registration. In the registerWebSocketHandlers method, the WebSocketHandlerRegistry is used to register a new ChatMessageHandler instance to handle WebSocket connections at the /chat endpoint.
					@Configuration
@EnableWebSocket
public class PlainWebSocketConfig implements WebSocketConfigurer {

	@Override
	public void registerWebSocketHandlers(WebSocketHandlerRegistry registry) {
		registry.addHandler(new ChatMessageHandler(), "/chat");
	}
}
The ChatMessageHandler must implement the WebSocketHandler that comes with a couple of methods to be implemented.
afterConnectionEstablished is called after a WebSocket connection has been successfully established. It executes once when a new WebSocket connection is made, allowing you to perform any initial setup or logging.
handleMessage is triggered whenever a message is received from the WebSocket client. It processes the incoming message and allows you to send a response back to the client. In this case, it logs the received message and sends a “hello from plain websocket” message back to the client.
handleTransportError method is called when a transport error occurs during the WebSocket communication. It handles issues such as network problems or protocol errors.
afterConnectionClosed is executed when a WebSocket connection is closed, either normally or due to an error. It provides information about the closure status and allows you to perform any cleanup or logging actions.
supportsPartialMessages indicates whether the WebSocket handler supports partial messages. It returns false in this implementation, meaning that the handler does not support partial messages and expects complete messages to be sent in a single frame.
@Slf4j
public class ChatMessageHandler implements WebSocketHandler {

	@Override
	public void afterConnectionEstablished(WebSocketSession session) throws Exception {
		log.info("connection established");

	}

	@Override
	public void handleMessage(WebSocketSession session, WebSocketMessage<?> message) throws Exception {
		log.info("message arrived {}", message);
		session.sendMessage(new TextMessage("hello from plain websocket"));
	}

	@Override
	public void handleTransportError(WebSocketSession session, Throwable exception) throws Exception {
		log.error("transport error");

	}

	@Override
	public void afterConnectionClosed(WebSocketSession session, CloseStatus closeStatus) throws Exception {
		log.info("connection clossed");

	}

	@Override
	public boolean supportsPartialMessages() {
		return false;
	}

}
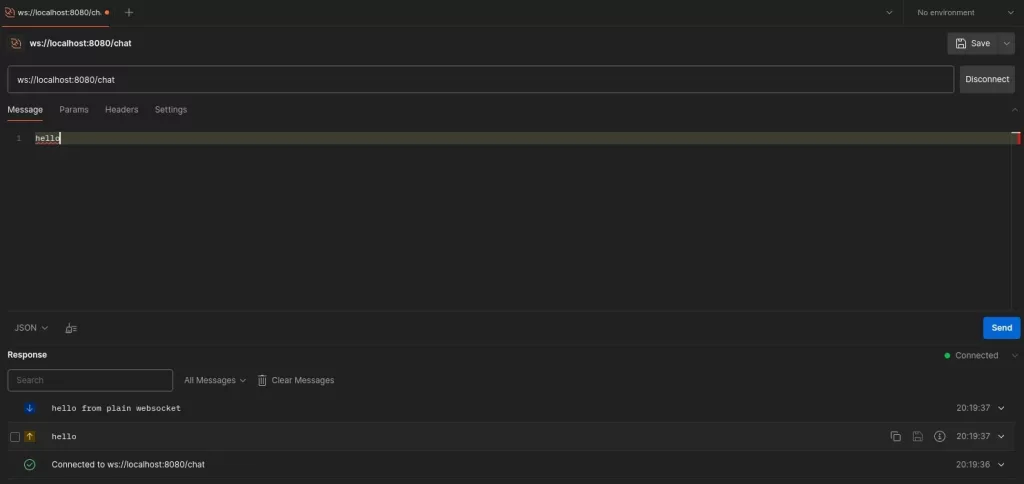
I tested from Postman and this is how it looks. Pay attention! You cannot connect to WebSocket with SockJS from Postman, only plain WebSocket is supported.
Conclusion
This is how you can configure plain or SockJS WebSocket in Spring-Boot and use it with React.
Checkout the blog for more similar content!
Happy coding!
[…] Configuring WebSocket in Spring-Boot and React […]
Does the conversation persist after the application is restarted or if the WebSocket server is disconnected ?
Do we need a database to store the messages ?
No, the conversation does not persist. The moment a message arrives it must be saved in a database in order to achieve persistence.
[…] If you want to learn about Websocket, check out this blog post. […]