Lejdi Prifti

0 %
Lejdi Prifti
Software Engineer
Web3 Developer
ML Practitioner
  • Residence:
    Albania
  • City:
    Tirana
  • Email:
    info@lejdiprifti.com
English
Italian
French
Spring
React & Angular
Machine Learning
Docker & Kubernetes
AWS & Cloud
Team Player
Communication
Time Management
  • Java, JavaScript, Python
  • AWS, Kubernetes, Azure
  • Bootstrap, Materialize
  • Css, Sass, Less
  • Blockchain, Ethereum, Solidity
  • React, React Native, Flutter
  • GIT knowledge
  • Machine Learning, Deep Learning
0

No products in the basket.

Configuring WebSocket in Flutter and Spring-Boot

16. October 2023

In this article, we are going to look at creating a simple chat application using Spring-Boot and Flutter. This will help us understand how to configure WebSocket in Flutter and Spring-Boot with SockJS.

What is WebSocket?

WebSocket is a communication protocol that enables real-time, bidirectional data transfer between a client (usually a web browser) and a server over a single, long-lived connection. Unlike traditional HTTP requests, which are stateless and involve separate requests and responsesWebSocket allows for continuous data exchange without the overhead of repeatedly establishing new connections.

We will use the server we built in the last article as a server for our application.

Configuring WebSocket in Spring-Boot and React

Let’s keep our focus on building a great mobile application with Flutter.

For this application, we will need a very important library that is stomp_dart_client .

Your dependencies section in the file pubspec.yaml must look like this.

# ...
dependencies:
flutter:
sdk: flutter
stomp_dart_client: 1.0.0

# ...

The chart.dart file, which will be created next, will most notably contain the WebSocket configurations required to connect to the SpringBoot server we installed in the previous article as well as the chat view, which includes an input, a floating action to send a message, and the actual messages themselves.

				
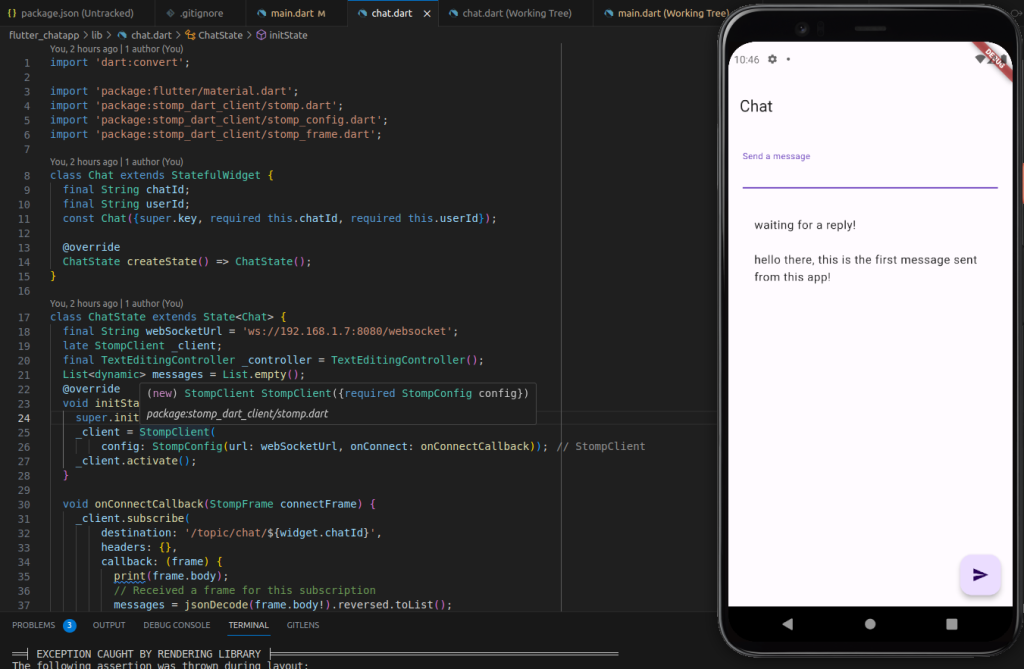
					import 'dart:convert';

import 'package:flutter/material.dart';
import 'package:stomp_dart_client/stomp.dart';
import 'package:stomp_dart_client/stomp_config.dart';
import 'package:stomp_dart_client/stomp_frame.dart';

class Chat extends StatefulWidget {
  final String chatId;
  final String userId;
  const Chat({super.key, required this.chatId, required this.userId});

  @override
  ChatState createState() => ChatState();
}

class ChatState extends State<Chat> {
  final String webSocketUrl = 'ws://192.168.1.7:8080/websocket';
  late StompClient _client;
  final TextEditingController _controller = TextEditingController();
  List<dynamic> messages = List.empty();
  @override
  void initState() {
    super.initState();
    _client = StompClient(
        config: StompConfig(url: webSocketUrl, onConnect: onConnectCallback));
    _client.activate();
  }

  void onConnectCallback(StompFrame connectFrame) {
    _client.subscribe(
        destination: '/topic/chat/${widget.chatId}',
        headers: {},
        callback: (frame) {
          print(frame.body);
          // Received a frame for this subscription
          messages = jsonDecode(frame.body!).reversed.toList();
        });
  }

  void _sendMessage() {
    final message = _controller.text;
    if (message.isNotEmpty) {
      _client.send(
        destination: '/app/chat/${widget.chatId}', // Replace with your chat ID
        body: json.encode({
          'data': message,
          'userId': widget.userId
        }), // Format the message as needed
      );
      _controller.clear();
    }
  }

  @override
  Widget build(BuildContext context) {
    double screenHeight = MediaQuery.of(context).size.height - 250;
    return Scaffold(
      appBar: AppBar(
        title: Text('Chat'),
      ),
      body: Padding(
        padding: const EdgeInsets.all(20),
        child: Column(
          crossAxisAlignment: CrossAxisAlignment.start,
          children: [
            Form(
              child: TextFormField(
                controller: _controller,
                decoration: const InputDecoration(labelText: 'Send a message'),
              ),
            ),
            const SizedBox(height: 24),
            SingleChildScrollView(
              child: Container(
                height: screenHeight, // Set a fixed height here
                child: ListView.builder(
                  itemCount: messages.length,
                  itemBuilder: (context, index) {
                    // Extract the item from the list
                    Map<String, dynamic> item = messages[index];

                    // Create a Text widget for the item
                    return ListTile(
                      title: Text(item['data']),
                      // You can add more widgets here, e.g., icons, buttons, etc.
                    );
                  },
                ),
              ),
            )
          ],
        ),
      ),
      floatingActionButton: FloatingActionButton(
        onPressed: _sendMessage,
        tooltip: 'Send message',
        child: const Icon(Icons.send),
      ),
    );
  }

  @override
  void dispose() {
    _client.deactivate();
    _controller.dispose();
    super.dispose();
  }
}


Documentation

Let’s break it down.

The code begins with import statements, including the dart:convert library for JSON encoding and decoding, and several packages related to Flutter and the Stomp WebSocket client.

Chat is a stateful widget that represents the chat interface. It takes two required parameters: chatId and userId. The widget defines a WebSocket URL, initializes a Stomp client, and maintains a list of messages.

The initState method is called when the widget is created. In this method, the Stomp client is configured with the WebSocket URL and a callback function to be executed when a connection is established. The client is then activated.

The onConnectCallbackmethod is called when the Stomp client successfully connects to the WebSocket server. It subscribes to a destination topic for receiving messages and defines a callback function to process incoming messages. In this callback, the received JSON message is decoded, reversed, and stored in the messages list. The reason it is reversed is due to the way the messages are stored in the server developed in this article.

The _sendMessagemethod is called when the user sends a message. It sends the message to a specific destination topic on the server, along with the user’s ID. The message is JSON-encoded.

The build method defines the user interface of the chat screen. It consists of an app bar, a text input field for sending messages, a scrollable list of messages, and a floating action button for sending messages.

Inside the ListView.builder, the messages list is iterated through to display each message. The list is reversed, so newer messages appear at the top. Each message is displayed in a ListTile widget, containing a Text widget to display the message content.

The dispose method is used to clean up resources when the widget is removed. It deactivates the Stomp client, disposes of the text controller, and calls the parent’s dispose method.

main.dart

On main.dart , we would have the following implementation to display a Chat interface in a hard-coded way.

				
					import 'package:flutter/material.dart';
import 'package:flutter_chatapp/chat.dart';

void main() {
  runApp(const MyApp());
}

class MyApp extends StatelessWidget {
  const MyApp({super.key});

  // This widget is the root of your application.
  @override
  Widget build(BuildContext context) {
    return MaterialApp(
        title: 'Chat Application',
        theme: ThemeData(
          colorScheme: ColorScheme.fromSeed(seedColor: Colors.deepPurple),
          useMaterial3: true,
        ),
        home: const Chat(chatId: '1', userId: 'lejdi'));
  }
}
				
			
flutter development

Keep an eye on this repository to see a better UI for this application with websocket integrated in Flutter and Spring-Boot.

If you found the article helpful, consider supporting by sharing. Thank you!

Posted in Flutter, SpringBootTags:
Write a comment
Receive the latest articles

Subscribe To My Weekly Newsletter

Get insights, practical tips, and career advice to advance your skills and stay ahead in the tech industry.