Lejdi Prifti

0 %
Lejdi Prifti
Software Engineer
Web3 Developer
ML Practitioner
  • Residence:
    Albania
  • City:
    Tirana
  • Email:
    info@lejdiprifti.com
English
Italian
French
Spring
React & Angular
Machine Learning
Docker & Kubernetes
AWS & Cloud
Team Player
Communication
Time Management
  • Java, JavaScript, Python
  • AWS, Kubernetes, Azure
  • Bootstrap, Materialize
  • Css, Sass, Less
  • Blockchain, Ethereum, Solidity
  • React, React Native, Flutter
  • GIT knowledge
  • Machine Learning, Deep Learning
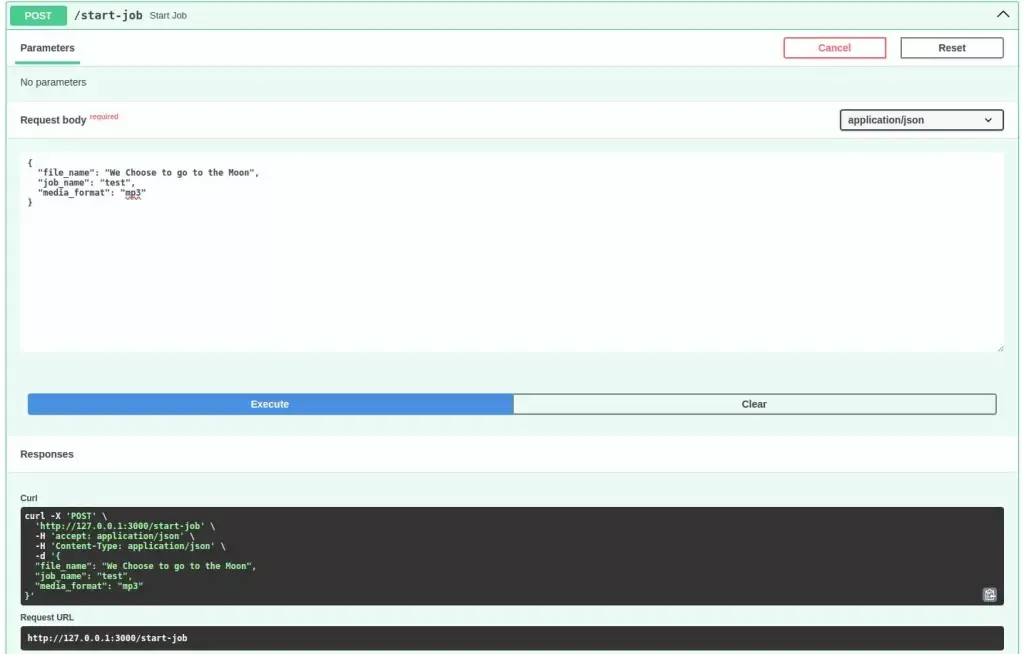
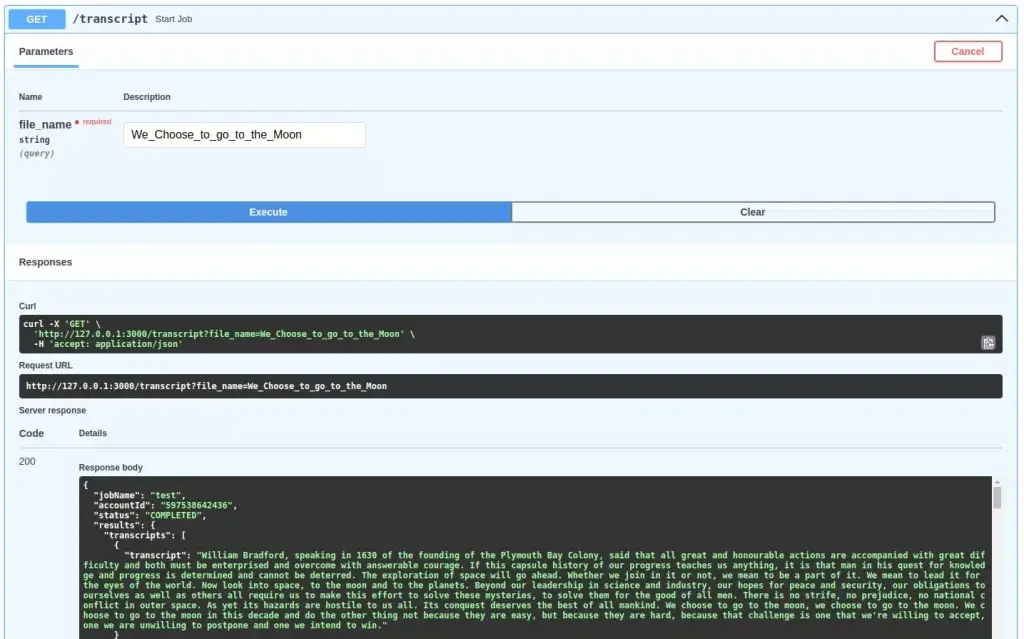
0

No products in the basket.

Quick tutorial to AWS Transcribe with Python

2. February 2024

In this tutorial, we are going to look at how we can use AWS Transcribe with Python and FastAPI. To follow this tutorial, you will need an AWS account and Docker installed in your local environment.

Transcribe is one of the services offered by Amazon Web Services to translate speech to text. How it works is that it takes an audio file from S3 and produces the written transcription of that audio. For more information, visit AWS Transcribe or simply follow along.

FastAPI is a modern, high-performance, web framework for building APIs with Python 3.8+ based on standard Python type hints. If you want to learn more about it, visit FastAPI homepage

Table of Contents

Project setup

In a new directory, we will create the requirements.txt file that will consist of all the necessary dependencies we need for our project. Among the most important packages there is boto3, which is the AWS SDK for Python. It is used to create, configure, and manage AWS services, such as Amazon Elastic Compute Cloud (Amazon EC2) and Amazon Simple Storage Service (Amazon S3).

				
					annotated-types==0.6.0
anyio==4.2.0
click==8.1.7
colorama==0.4.6
exceptiongroup==1.2.0
fastapi==0.109.0
fastapi-utils==0.2.1
greenlet==3.0.3
psycopg2-binary==2.9.9
pydantic==1.10.13
pydantic_core==2.14.6
python-dotenv==1.0.0
typing_extensions==4.9.0
uvicorn==0.25.0
numpy==1.26.3
boto3==1.34.33


API configurations

Next, we will write the necessary configurations to quickly setup our FastAPI application.  In the root directory, let’s create a folder named src and inside it a file main.py.  The first line imports the FastAPI class from the fastapi package we inserted previously in the requirements.txt file. The second line creates an instance of the FastAPI class and assigns it to the variable app. This instance represents our FastAPI application and will be used to define the various endpoints and settings for our API.

				
					from fastapi import FastAPI

app = FastAPI()


Transcribe Service

Now, it’s time to do what you came here for. Let’s setup the AWS Transcribe service with Python. 

As we already mentioned before, AWS Transcribe reads an audio file from an S3 bucket and then, it stores the transcription of that audio file in another bucket you specify. 

First of all, go to S3 and create a general purpose bucket. S3 is a global service and the name of the bucket must be unique. I named my bucket lejdiprifti-stt-inputs to represent the audio files (inputs) for our speech-to-text service.

Additionally, since we are at S3, let’s create also the output bucket. I named it lejdiprifti-stt-outputs.  Great!

Now, we can start using the boto3 package to communicate with the AWS Transcribe API. 

				
					class TranscribeService:
        def __init__(self):
            self.client = boto3.client("transcribe")
    
        def start_job(self, job_name: str, media_format: str, file_name: str):
            self.client.start_transcription_job(
                TranscriptionJobName=job_name,
                LanguageCode="en-IN",
                MediaFormat=media_format,
                Media={
                    "MediaFileUri": f"s3://lejdiprifti-stt-inputs/{file_name}.{media_format}",
                },
                OutputBucketName="lejdiprifti-stt-outputs",
                OutputKey=f"{file_name.replace(' ', '_')}.json",
            )


Inside the constructor, a Boto3 client for the Amazon Transcribe service is created and assigned to the instance variable self.client.

The method start_transcription_job transcribes the audio from a media file and applies any additional Request Parameters we specify.

The TranscriptionJobName is a custom job name we choose for our transcription job and it must be unique inside our AWS account. LanguageCode represents the language of the speech in our media file. MediaFortmat stands for the format of the audio file, such as mp3, mp4, wav, etc. MediaFileUri is used to specify the Amazon S3 location of our media file. Since we choose the bucket lejdiprifti-stt-inputs as the bucket where we will upload our media files, we write it in the MediaFileUri. OutputBucketName is the bucket where the transcription json will be uploaded and the OutputKey is the key of the output file in S3.

S3 Service

Great, let’s imagine for a moment that we created our job. However, we need to read the transcription file that Transcribe wrote to the output bucket. To accomplish this purpose, we will create a new service named S3Service.

				
					import json
import boto3

class S3Service:
    def __init__(self):
        self.client = boto3.client("s3")

    def read_transcripted_file(self, file_name: str):
        response = self.client.get_object(
            Bucket="lejdiprifti-stt-outputs", Key=f"{file_name}.json"
        )
        return json.loads(response["Body"].read().decode("utf-8"))


As we saw previously, inside the constructor, we define a Boto3 client for the Amazon S3 service assigned to the instance variable self.client.

The method read_transcripted_file uses the S3 client to retrieve an object (file) from the specified S3 bucket (lejdiprifti-stt-outputs) with the specified key ({file_name}.json). Then, it reads the content of the object’s body, decodes it from bytes to a UTF-8 string, and then loads the JSON data using json.loads. The resulting JSON data is returned.

AWS Credentials

Probably you are asking yourself. Where do we specify the AWS credentials? 

First of all, to use AWS credentials, you must have created an IAM user and given it permissions to fully access S3 and Transcribe (AmazonS3FullAccessAmazonTranscribeFullAccess ) . Then, you must create a pair of Access Key and Secret Access Key for that IAM user. 

Next, we will create an .env file where we will specify these credentials and load them in the environment of the docker container.

				
					AWS_ACCESS_KEY_ID=xxxxxxxxxxxxxxxxxxxxxx
AWS_SECRET_ACCESS_KEY=xxxxxxxxxxxxxxxxxxxxxx+xxxxxxx
AWS_DEFAULT_REGION=eu-central-1


Router setup

Finally, we will create the routers to be able to test our services. First step is to create a new folder named routers, inside which we will create the files __init__.py and transcribe_router.py.

The __init__.py will contain a class that represents a FastAPI router. The method attach_router attaches the router to the given FastAPI app. 

				
					from fastapi import APIRouter, Body, HTTPException, Query, status

from src.logger import BasicLogger

logger = BasicLogger(__name__)

class Router:
    router = APIRouter()
    status = status
    Query = Query
    Body = Body
    HTTPException = HTTPException

    def attach_router(self, app, routers) -> None:
        logger.info(f"Attaching routers to FastAPI app.")
        [app.include_router(router) for router in routers]


In the transcribe_router.py, we define the router that includes two endpoints. One of the endpoints starts the transcription job and the other, reads the transcription file. 

				
					from src.routers import Router
from src.schemas import StartJobRequest
from src.service import S3Service, TranscribeService


class TranscribeRouter(Router):
    transcribe_service: TranscribeService = TranscribeService()
    s3_service: S3Service = S3Service()

    @Router.router.post("/start-job")
    async def start_job(start_job_request: StartJobRequest = Router.Body()):
        TranscribeRouter.transcribe_service.start_job(
            file_name=start_job_request.file_name,
            media_format=start_job_request.media_format,
            job_name=start_job_request.job_name,
        )

    @Router.router.get("/transcript")
    async def start_job(file_name: str = Router.Query()):
        return TranscribeRouter.s3_service.read_transcripted_file(file_name=file_name)


The StartJobRequest is a class in the schemas folder that includes three attributes file_name, job_name and media_format

Furthermore, we need to attach the TranscribeRouter to the app. In the main.py, we will add the following lines.

				
					from fastapi import FastAPI

from src.routers import Router
from src.routers.transcribe_router import TranscribeRouter

app = FastAPI()
router = Router()

transcribe_router = TranscribeRouter().router
routers_list = [transcribe_router]
router.attach_router(app, routers_list)


Perfect, we are almost finished. Let’s add also the docker-compose.yml and Dockerfile in the root directory of the application.

				
					# Use a Python image as the base image
FROM python:3.11-alpine

# Set the working directory inside the container
WORKDIR /app

# Copy necessary files into the container
COPY requirements.txt .

# Install dependencies
RUN pip install --no-cache-dir -r requirements.txt

# Copy the rest of the source code into the container
COPY . .

# Expose port 3000
EXPOSE 3000

# Run the command to start the application
CMD ["uvicorn", "src.main:app", "--host", "0.0.0.0", "--port", "3000"]


In the docker-compose.yml, we will reference the environment variables we defined in the .env file.

				
					version: "3.8"
services:
  # The main service
  srv:
    build: .
    ports:
      - 3000:3000
    restart: always
    environment:
      AWS_ACCESS_KEY_ID: ${AWS_ACCESS_KEY_ID}
      AWS_SECRET_ACCESS_KEY: ${AWS_SECRET_ACCESS_KEY}
      AWS_DEFAULT_REGION: ${AWS_DEFAULT_REGION}


To start the application we can use the following command.

				
					docker-compose up --build


Time to test

After running the above command, you can access the Swagger docs in the following link http://127.0.0.1:3000/docs

Previously, I uploaded in the inputs bucket an audio file from the speech of John F. Kennedy, where he declared that the US had decided to go to the Moon. The key of the file in the S3 bucket is We Choose to go to the Moon.mp3.

aws transcribe job

After successfully executing the above request, in the Transciption jobs tab of AWS Transcribe we will see the job named test.

aws transcribe job completed

To conclude, we will read the content of the transcription generated in the output S3 bucket.

aws s3 read object

In this article, we saw how you can use AWS Transcribe with Python and FastAPI. If you found the article helpful, consider sharing or leave a comment.

If you want to learn how this transcription process can happen in real time, checkout this other blog post

For more articles, visit my blog.

Buy Me A Coffee
Posted in DevOpsTags:
2 Comments
Write a comment